User manual · Misuro 1.6
How to use Misuro
Drop your images, pick a size and a format, press Export. Everything else is here, step by step.
In short. Drag photos or folders into the window, pick a preset (or set Dimensions and Format yourself), check the preview and press Export (⌘ E). Your originals are never changed: Misuro always creates new copies.
1Getting started
The first time you open Misuro, the window is empty with the settings on the right. To add images you can:
- drag them into the window: single photos or whole folders, subfolders included;
- click Choose Images…, or choose File › Add Images… (⌘ O);
- drop them on Misuro’s icon in the Dock, or use Open With › Misuro in the Finder.
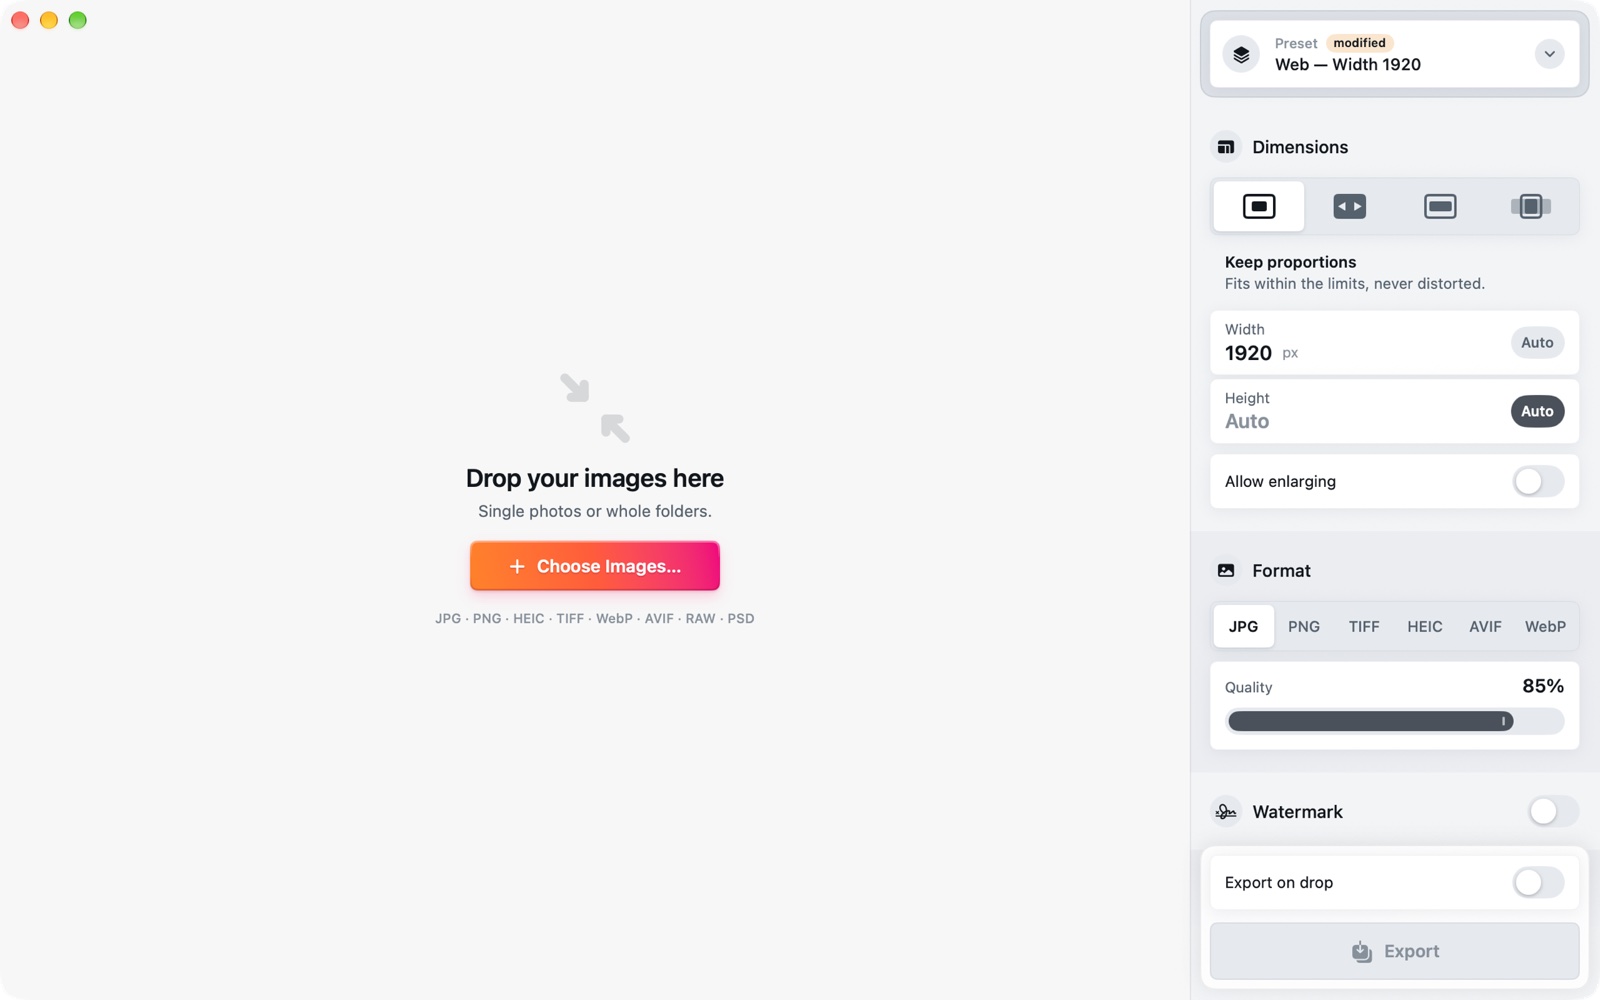
Misuro reads every format your Mac can open: JPG, PNG, HEIC, TIFF, WebP, AVIF, camera RAW files, PSD and more. It imports up to 5,000 files from a folder at a time and skips anything that is not an image.
Then it takes three steps: choose a size and a format (or a preset), check the result in the preview, and press Export.
2Queue and preview
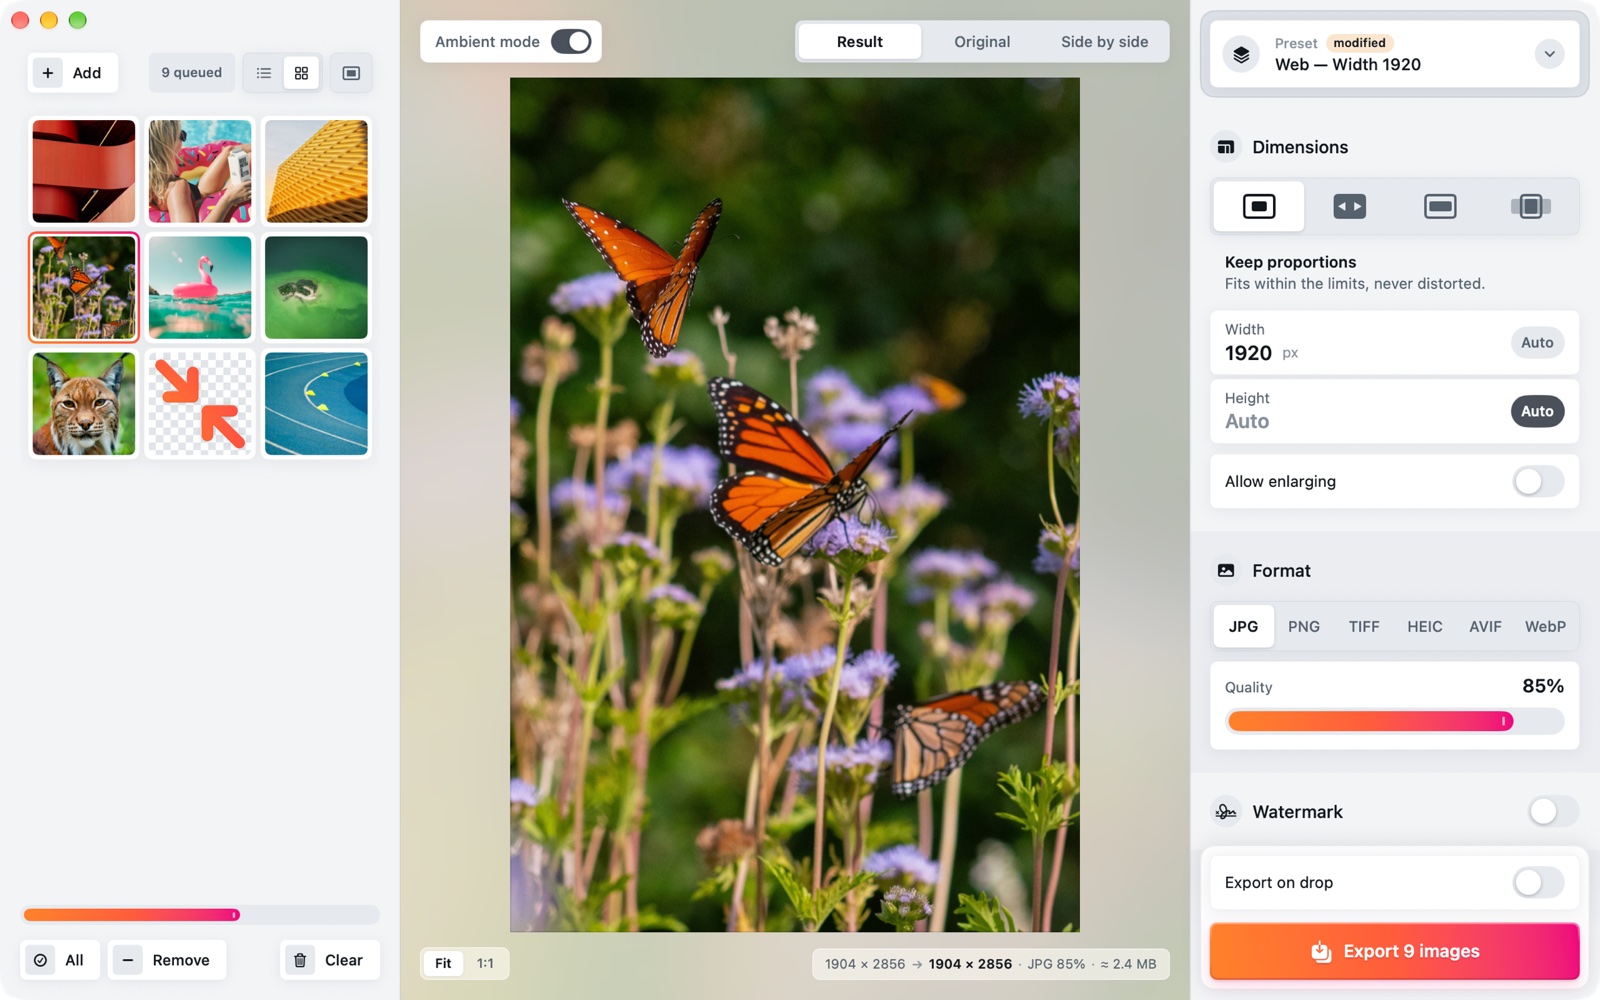
On the left is the queue of the images you added, in the middle the preview of the selected image, on the right the settings. Drag the edge of the queue to make it wider or narrower; double-click the edge to bring it back to its starting width.
The queue
- Icon view (⌥ ⌘ 2) or list view (⌥ ⌘ 1): the list shows the original and the final size of every file.
- In icon view, show 1 to 6 images per row with ⌘ + and ⌘ −, as squares or with their real proportions.
- Select as in the Finder: click, ⌘-click, ⇧-click, arrow keys, dragging a box, or All (⌘ A).
- Remove (⌘ ⌫) takes the selected images out, Clear (⇧ ⌘ ⌫) empties the queue. Removing an image from the queue never deletes the file.
- Right-click an image to show it in the Finder, original or exported.
The preview
- Result, Original or Side by side (⌘ 1, 2, 3). In the Original view, the parts that will be cropped are dimmed.
- Fit shows the whole image, 1:1 shows it at actual size to check sharpness and compression; double-click to switch, and at 1:1 drag to move around.
- Ambient mode blurs the image’s colours into the preview background (⌃ ⌘ A).
- The box at the bottom right sums it up: original size → final size, format and quality, and the estimated file size.
3Dimensions
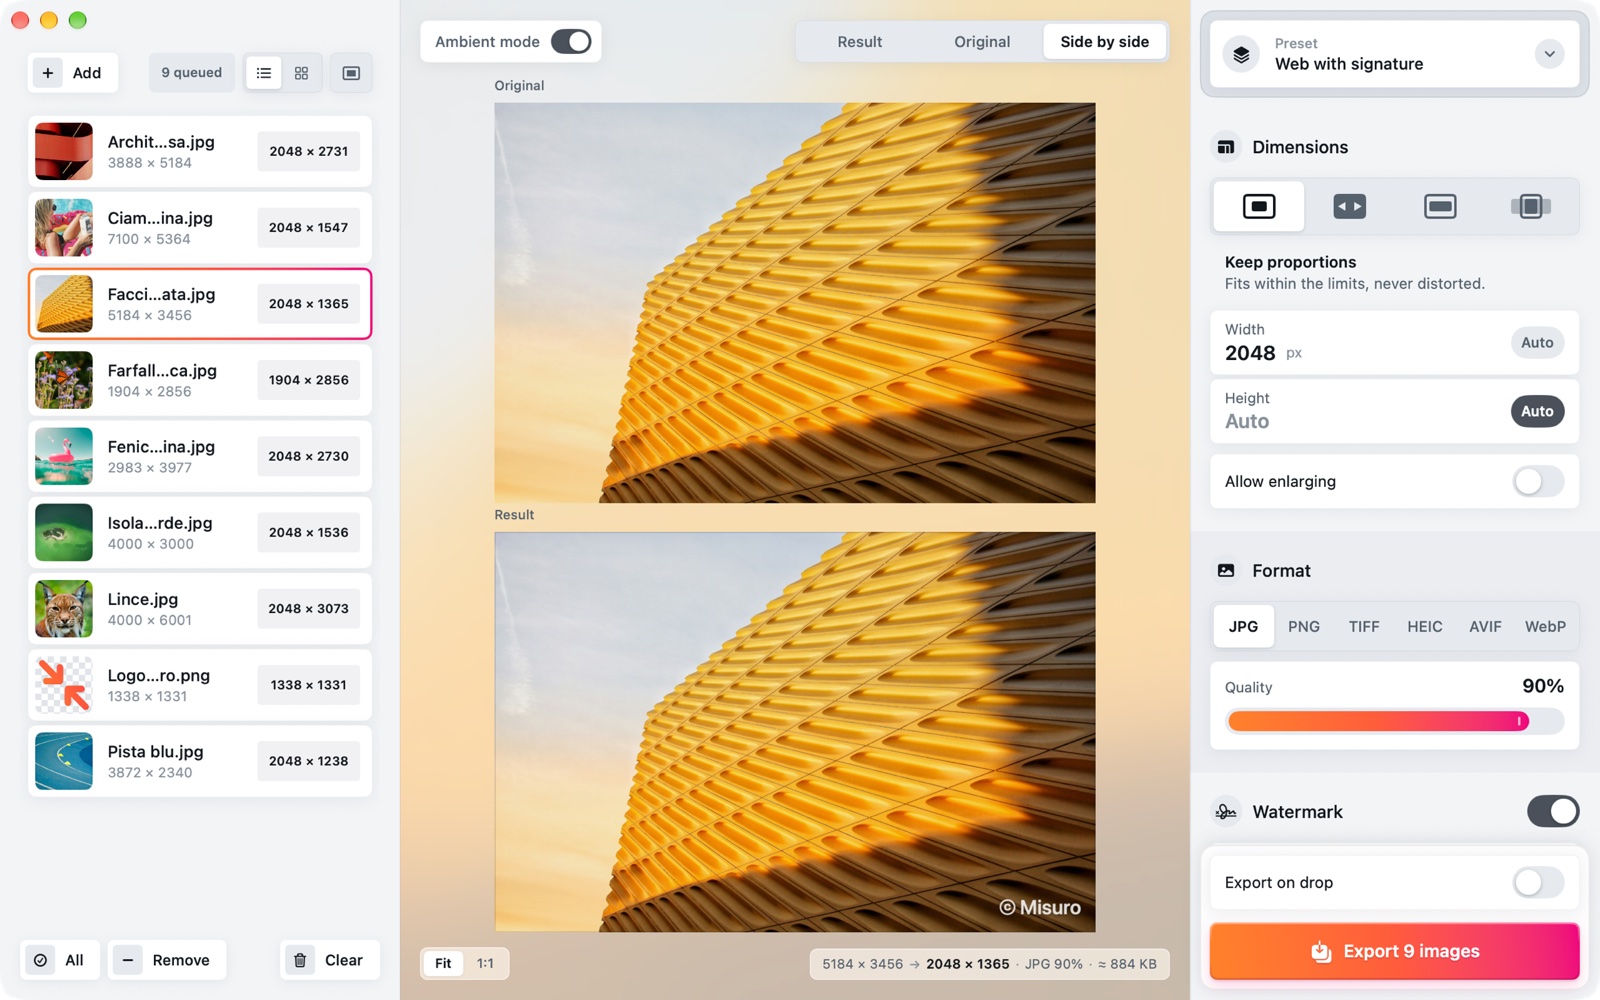
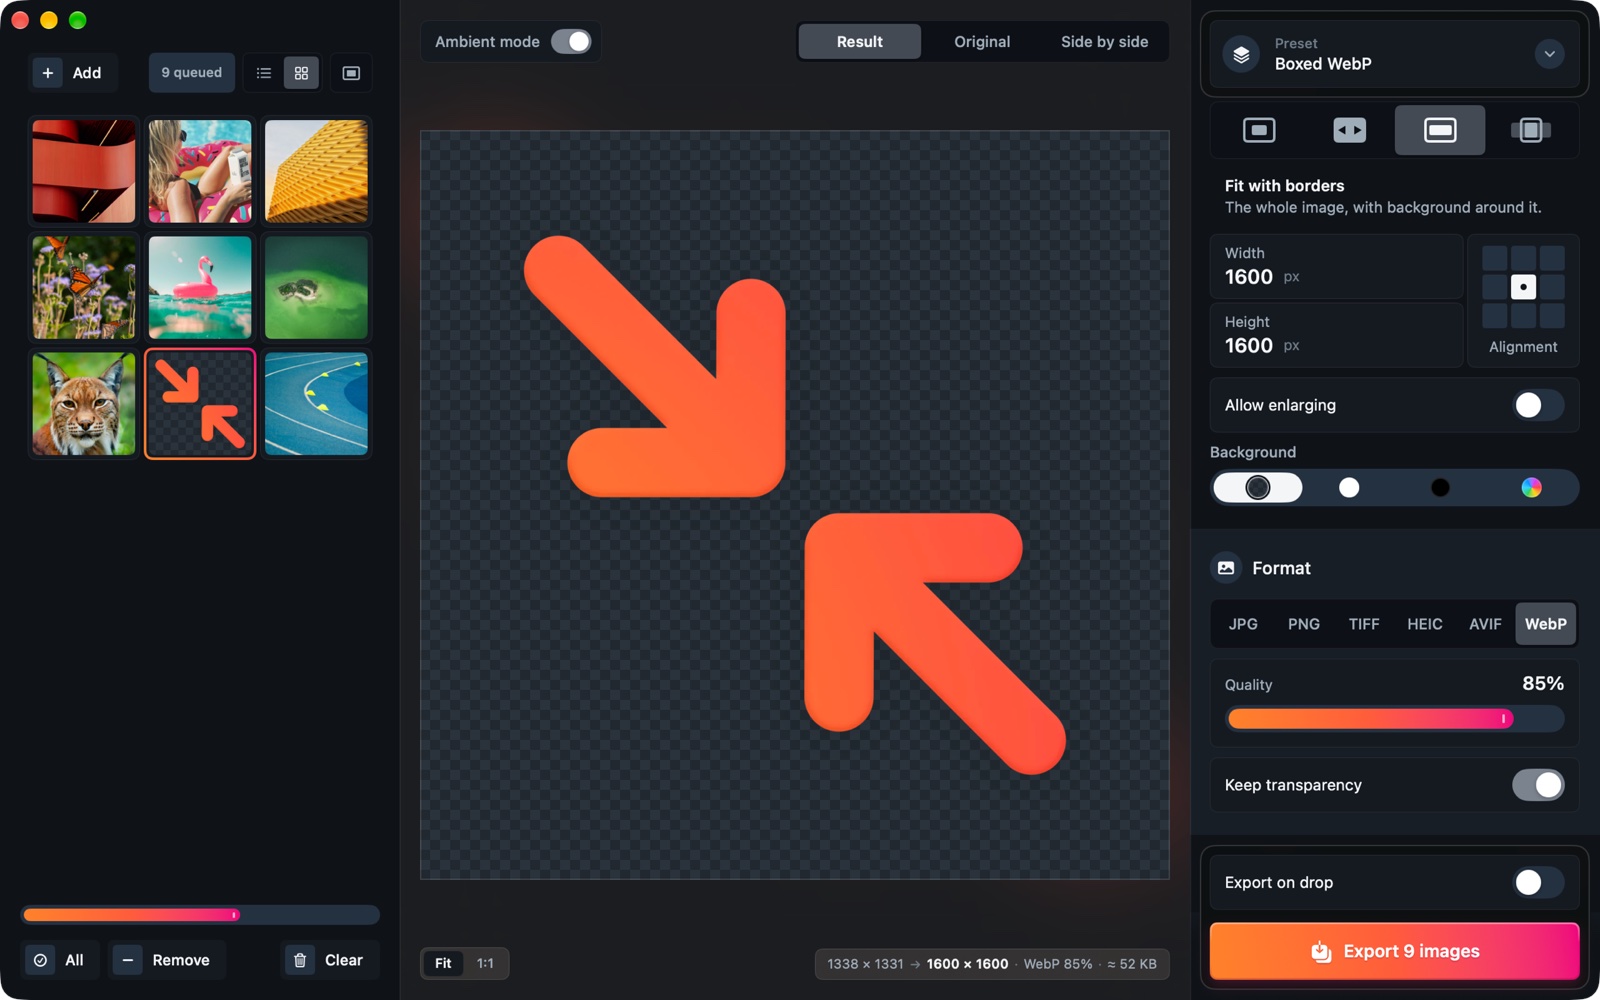
In Dimensions, choose how the size changes with the four buttons at the top. Below them you see the mode’s name and a line saying what it does.
| Mode | What it does | When to use it |
|---|---|---|
| Keep proportions | The image fits within the width and height you set, without distortion. | Photos for the web, email, archive. |
| Exact size | Exactly the size you set, even if the image gets distorted. | Only when the size is fixed and the proportions already match. |
| Fit with borders | The whole image inside the size, with the background around it. | Square formats without cutting anything: logos, products, icons. |
| Fill and crop | Fills the size and crops whatever is left over. | Squares and portraits for social media, matching thumbnails. |
- Width and Height are in pixels, up to 30,000. In Keep proportions one side can stay on Auto: it is worked out from the proportions. With both on Auto the size doesn’t change, only the format and metadata do.
- For a fixed long side, for example 1280 px for both landscape and portrait photos, type the same number in width and height.
- Allow enlarging is usually off: images smaller than the size stay as they are, and Misuro tells you after the export. Turn it on if you want them enlarged.
- In Fill and crop, choose the Anchor, that is which part to keep (centre, top, bottom right…); in Fit with borders, the Alignment of the image in the space.
- Background: transparent, white, black or a colour of your choice. It fills the borders and, in formats without transparency such as JPG, the transparent areas.
4Presets
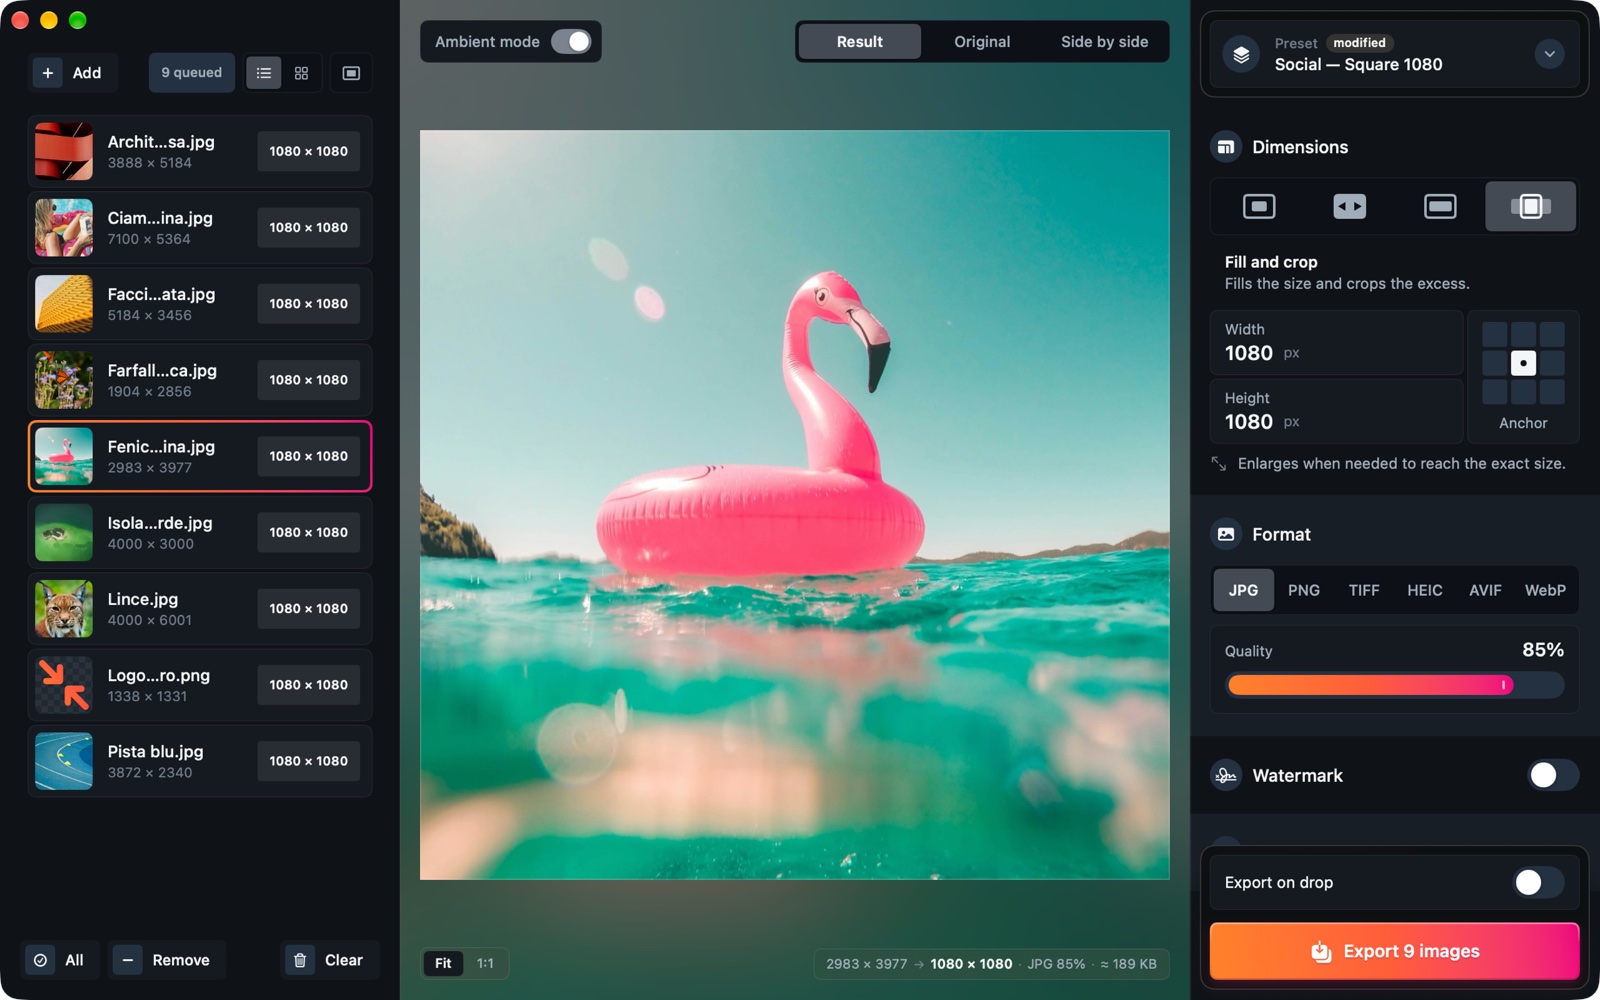
A preset saves all the settings together: size, format, quality, colour and metadata, watermark. The card at the top of the settings shows the active preset; click it to change. If you change something, the modified label appears.
| Built-in preset | Size | Quality |
|---|---|---|
| Web — Width 1920 | 1920 px wide | JPG 85% |
| Email — Long side 1280 | 1280 px long side | JPG 75% |
| Social — Square 1080 | 1080 × 1080, cropped | JPG 85% |
| Social — Portrait 1080 × 1350 | 1080 × 1350, cropped | JPG 85% |
| 4K screen — Long side 3840 | 3840 px long side | JPG 90% |
| Original size — Format only | unchanged | JPG 90% |
All built-in presets remove the GPS location and don’t enlarge small images.
- New… creates a preset from the current settings, Duplicate makes a copy, Rename… and Delete… work on your own presets.
- Save updates one of your presets after a change, Revert goes back to how it was.
- Free settings: no preset, you set everything by hand.
Tip. Built-in presets can’t be overwritten: to change one, edit it and choose Duplicate. You get your own version, with your own name.
5Format and quality
In Format, choose the file type: JPG, PNG, TIFF, HEIC, AVIF or WebP.
- Quality (for JPG, HEIC, AVIF and WebP): lower means a lighter file. Between 75 and 90% the difference is hard to see; check at 1:1 in the preview and watch the estimated size.
- PNG and TIFF are lossless: quality doesn’t apply.
- Keep transparency for PNG, TIFF, HEIC, AVIF and WebP. JPG doesn’t support it: transparent areas take the Background colour, and Misuro reminds you.
| Format | Good for |
|---|---|
| JPG | Photos to share anywhere: every app opens it. |
| WebP, AVIF | Websites: much lighter at the same quality. |
| HEIC | Archiving on Mac and iPhone, light and good quality. |
| PNG | Logos, graphics, screenshots, transparency. |
| TIFF | Print and further editing, lossless. |
Which one is smallest? We measured it in JPEG, WebP, AVIF or HEIC: which is smallest?
6Colour and metadata
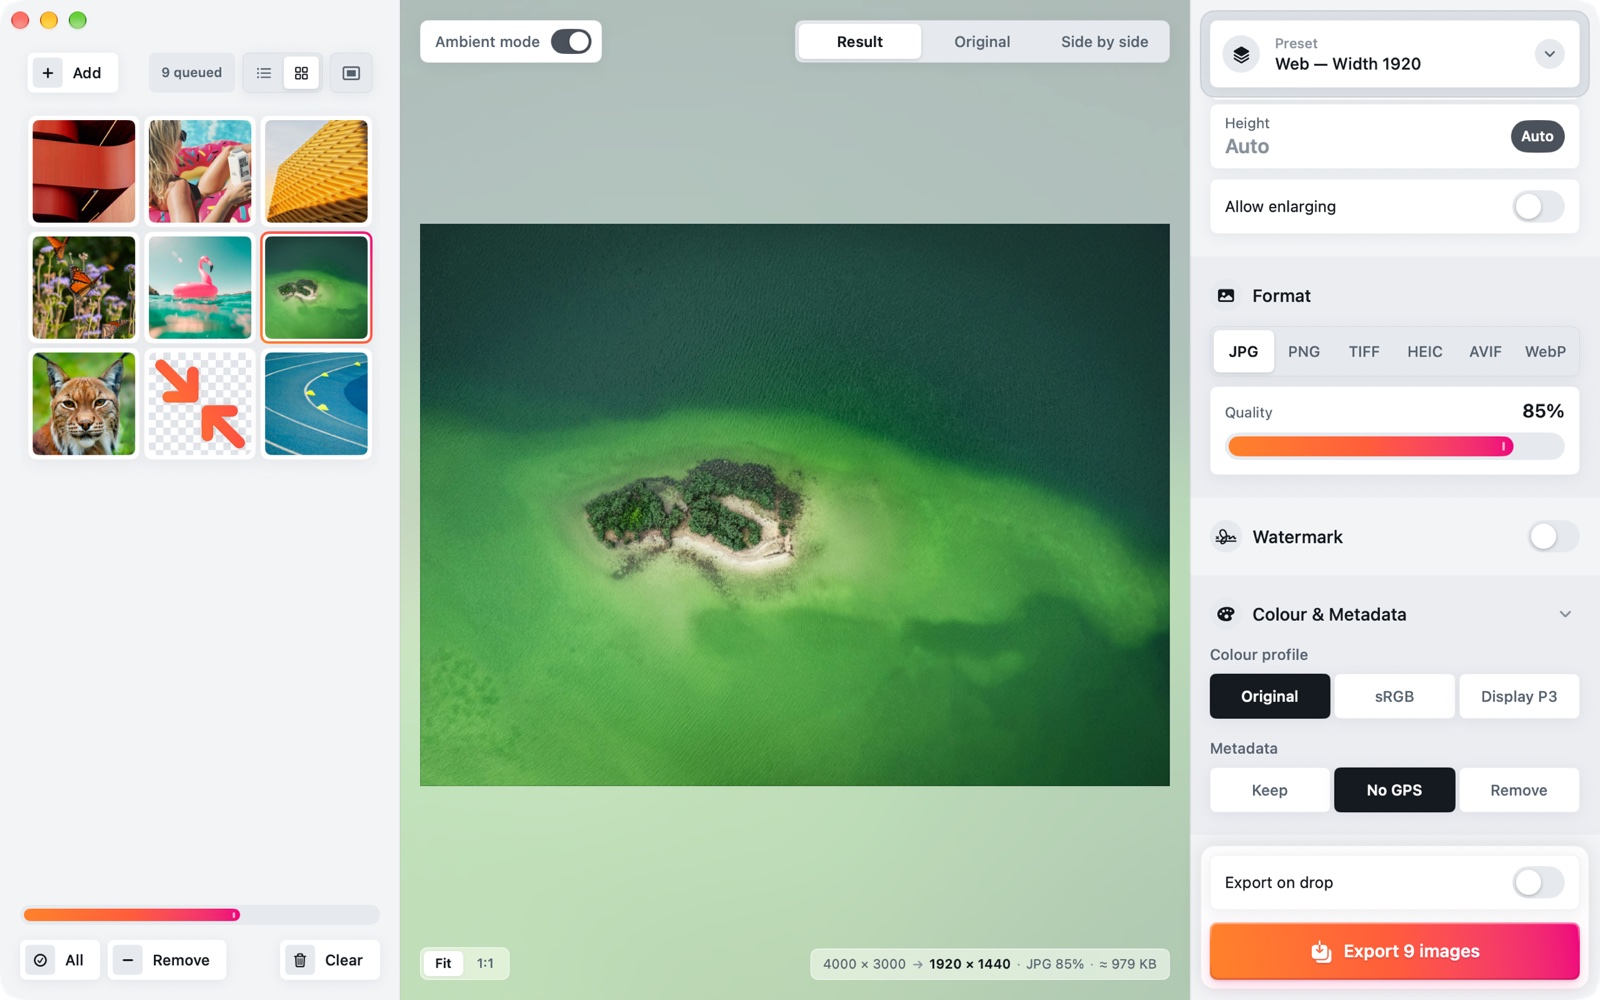
This section starts closed: click its title to open it.
Colour profile
Original keeps the photo’s colour space, for example the iPhone’s Display P3. sRGB is the safest choice for the web and for uncalibrated screens; Display P3 keeps the most saturated colours on Apple displays. Colours are truly converted, not just relabelled, and the profile is embedded in the file.
Metadata
- Keep: keeps everything, GPS location included. Careful if you publish the photos.
- No GPS (default): author, copyright and capture data stay; location, maker notes and thumbnails go.
- Remove: no EXIF, IPTC or GPS data.
In every case the photo’s rotation is applied to the pixels, so photos come out upright in every app. More on this: how to remove the location from your photos.
For PNG and TIFF there is also Keep 16 bits per channel when present, useful for scans and photos you will edit further.
7Watermark
Turn on the Watermark switch to sign every image with a text, for example “© Your Name”.
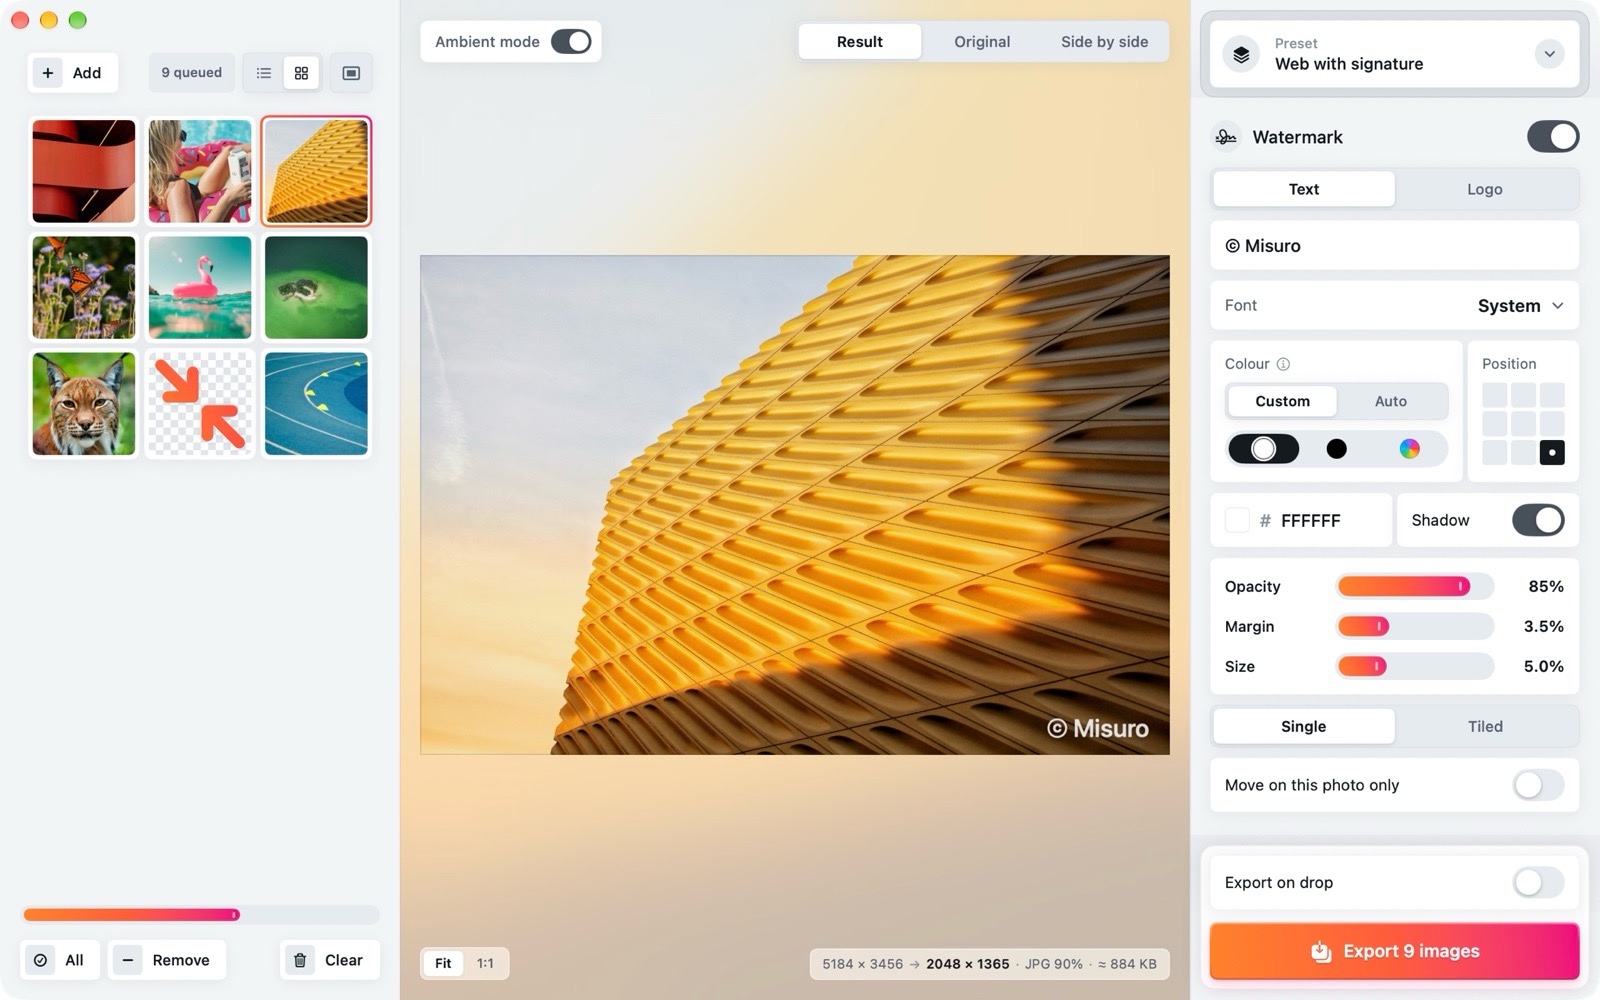
- Text: the signature. If it is too long for the image, it shrinks to fit.
- Colour: white, black or a colour of your choice; Shadow keeps it readable on light backgrounds too.
- Position: one of the nine points of the grid.
- Opacity, Size (relative to the image’s short side) and Margin from the edge: the signature looks the same on large and small photos.
Save the watermark in a preset to have it ready. More tips in how to add a watermark to your photos.
8Export
Press Export (⌘ E) to export the whole queue, or choose File › Export Selected… (⇧ ⌘ E) for the selected images only. A panel opens where you choose:
- Save to: a selected folder, or next to originals. In that case the files go into a “Misuro” subfolder next to each original (you can turn it off in Settings).
- Keep subfolders: if you dropped a folder with subfolders, the same structure is recreated at the destination.
- File names: same as original or custom, with a template that can include a sequence number, the original name, the folder, date, time and sizes. An example appears right below.
Misuro works on several images at once, using all of your Mac’s cores. During the export you see the progress and can press Cancel (⌘ .). At the end, a summary tells you how many images were exported and how much space you saved, with Show in Finder and, if something failed, Retry.
- Export Again (⌥ ⌘ E) exports again to the same folder with the same names, without the panel: handy after tweaking a setting.
- No file is ever overwritten: if a name already exists, Misuro adds a number (photo-2.jpg). Your originals always stay untouched.
Export on drop
With this switch, above the Export button, every image you drop into the window is exported straight away, without the panel. The line below shows where the files go; the folder button picks another destination: a folder, next to originals in the Misuro subfolder, or next to originals in the same folder.
9Menu bar and Finder Quick Action
To work without opening the window:
- Open Misuro › Settings… (⌘ ,), Menu Bar tab, and turn on Show Misuro in the menu bar. If you like, also turn on Open at login: at login only the icon appears.
- Drag photos or folders onto Misuro’s icon in the menu bar: a small Drop to export panel opens, and at the end one click shows the files in the Finder.
- Click the icon to choose the preset, the format and where to save. The default preset is Current Settings, the ones you have in the window.
In the Finder, select some images, right-click and choose Quick Actions › Resize with Misuro: they are exported straight away with the same choices as the menu bar, even if the icon is off. If you don’t see the action, choose Quick Actions › Customize… and turn on Resize with Misuro.
The menu bar and the Quick Action don’t touch the window’s queue, and have their own destination: next to originals, by default.
10Settings
In Misuro › Settings… (⌘ ,), General tab:
- Appearance: match system, light or dark.
- Processing: CPU (recommended) or GPU (Metal).
- Export: whether to create a “Misuro” subfolder when saving next to originals.
- Preview: whether to estimate the file size.
The Menu Bar tab is described above.
11Keyboard shortcuts
- ⌘ O
- Add images
- ⌘ E
- Export the whole queue
- ⇧ ⌘ E
- Export selected
- ⌥ ⌘ E
- Export again to the same folder
- ⌘ .
- Cancel the export
- ⇧ ⌘ R
- Show exported in Finder
- ⌘ A
- Select all
- ⌘ ⌫
- Remove from queue
- ⇧ ⌘ ⌫
- Clear the queue
- ⌥ ⌘ 1 / 2
- List view / Icon view
- ⌘ + / −
- Larger / smaller icons
- ⌘ 1 / 2 / 3
- Result / Original / Side by side
- ⌘ 0
- Zoom to fit
- ⌥ ⌘ 0
- Actual size (1:1)
- ⌃ ⌘ A
- Ambient mode
Images and export
Queue
Preview
12If something goes wrong
- Misuro asks you to authorise a folder. Mac App Store apps can only write where you allow them. Authorise your Home folder, or the external drive, once: it covers every subfolder.
- An image stayed smaller. It is smaller than the size you asked for and Allow enlarging is off: turn it on to enlarge it.
- Transparent areas turned white. JPG doesn’t support transparency: choose PNG, WebP, HEIC, AVIF or TIFF.
- A file can’t be read. If Preview can’t open it either, the file is damaged or in a format the Mac doesn’t know.
- An animated GIF or a multi-page PDF. Misuro processes only the first frame or page, and tells you so.
More answers on the support page. Can’t find what you need? Write to support@misuro.app.

Misuro for Mac
Resize, crop and convert photos in batches, with presets, watermarks and metadata control. Offline, one-time purchase.